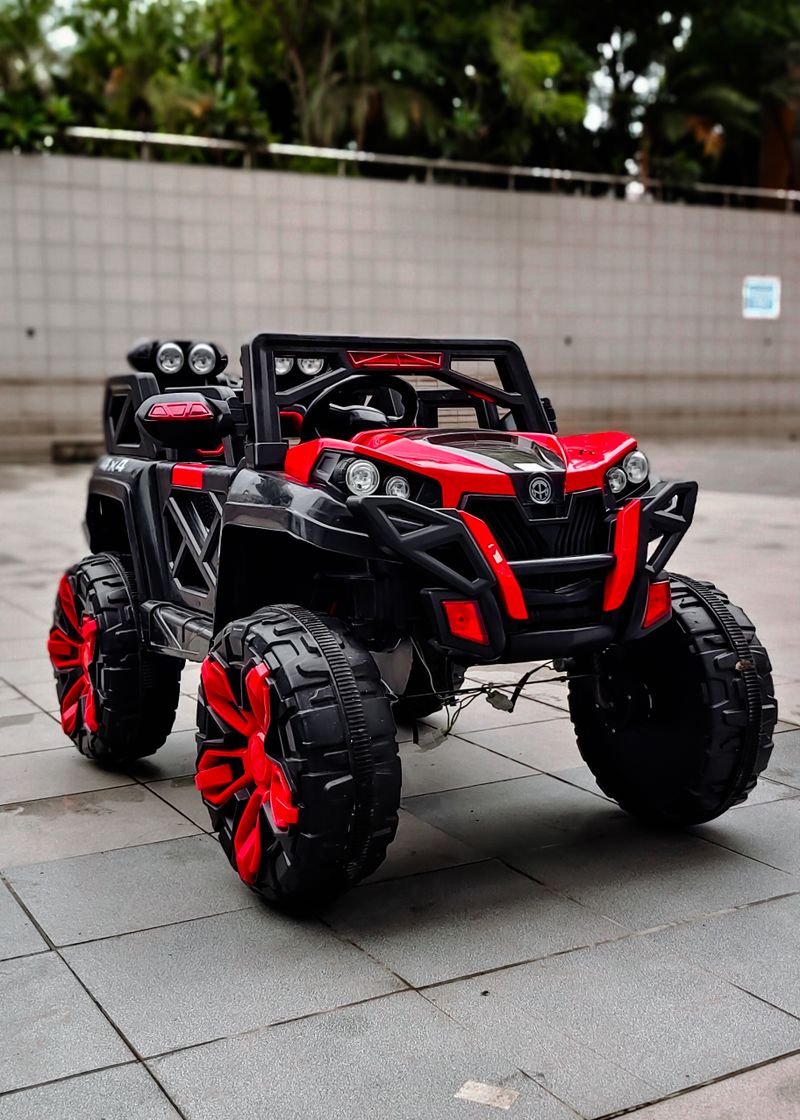
Why Power Wheels?
A Power Wheels ride-on is the largest consumer "robot" most people have ever seen — and it already has the two hardest parts of a mobile robot sorted: powerful DC motors and a battery big enough to run them. The chassis is sturdy, the wheels are real, and there's enough room inside to mount a full computer, a sensor suite, and a cooler full of drinks (seriously — autonomous cooler bot is a winning competition entry).
This is the build that makes people stop and stare. A self-driving kid's car rolling through an arena with nobody at the wheel hits different.
What You Bring
The kit includes the motor controllers, sensor array, and autonomous driving hardware. You supply:
- Power Wheels ride-on car — any model, any condition (motors and wheels must work)
- Raspberry Pi 4 / 5 — runs navigation, sensor fusion, and optional LIDAR
- microSD card — 32GB recommended (OS + mapping data)
- 12V deep-cycle battery — upgrade from stock 6V/12V Power Wheels battery for longer runtime and more current
- RC transmitter/receiver — for manual override and safety kill (2.4GHz, 6+ channel recommended)
What's Included in the BYOB Kit
- Dual BTS7960 43A motor drivers
- Industrial mushroom emergency kill switch
- 9-DOF IMU (accelerometer + gyro + magnetometer)
- Ultrasonic sensor array (4x HC-SR04) with bumper mounts
- Terminal block distribution board
- Complete wiring harness with labeled connectors
- Pi mounting plate and sensor brackets (3D-printed)
- Complete source code, wiring diagrams, and setup documentation
What You Bring
The Full Send Kit includes all electronics and hardware. You supply:
- Power Wheels ride-on car — any model, any condition (motors and wheels must work)
- 12V deep-cycle battery — upgrade from stock 6V/12V Power Wheels battery for longer runtime and more current
What's Included in the Full Send Kit
- Raspberry Pi 4B — pre-loaded with navigation software
- 32GB microSD card — pre-imaged with Raspberry Pi OS and kit software
- 6-channel RC transmitter and receiver (2.4GHz)
- Dual BTS7960 43A motor drivers
- Industrial mushroom emergency kill switch
- 9-DOF IMU (accelerometer + gyro + magnetometer)
- Ultrasonic sensor array (4x HC-SR04) with bumper mounts
- Terminal block distribution board
- Complete wiring harness with labeled connectors
- Pi mounting plate and sensor brackets (3D-printed)
- Complete source code, wiring diagrams, and setup documentation
Project Files — Included with BYOB Kit
Complete source code, wiring diagrams, and documentation. Enter your kit code to unlock.
Don't have a code? Get the kit — code included in every box.
Step-by-Step
Gut & Understand the Stock Wiring
Power Wheels wiring is simple — a battery, a foot-pedal switch, and one or two DC motors. Remove the foot pedal and any stock switches. Map the wires:
- Single-motor models: One motor drives both rear wheels through a gearbox. Steering is front-axle, often just a steering wheel connected to tie rods.
- Dual-motor models: One motor per rear wheel. This is ideal — you get differential (tank) steering for free by running the motors at different speeds.
Install Motor Drivers
The BTS7960 H-bridge module handles the current draw of Power Wheels motors (15–30A under load, 40A+ stall). Wire each motor through its own driver:
# BTS7960 wiring (per motor):
# B+ (battery positive) → driver VCC
# B- (battery negative) → driver GND
// ... full implementation in project files
Motorize the Steering (Single-Motor Models)
If you've got a single rear motor, you need to actuate the front steering. Options:
- Linear actuator: Mount a 12V linear actuator from the chassis to the steering tie rod. Control with an H-bridge. Position feedback via a potentiometer on the steering column.
- High-torque servo (25+ kg·cm): 3D-print or fabricate a bracket to connect a large servo directly to the steering column. Simpler but needs a beefy servo.
- Windshield wiper motor: Another junkyard hack — wiper motors are geared, 12V, and incredibly strong. Mount with a crank arm to the steering linkage.
Sensor Suite
Mount sensors around the perimeter. Minimum viable sensor package:
- Front: 3× ultrasonic sensors (center + 45° left/right) — obstacle detection
- Rear: 1× ultrasonic — backup detection
- Bumper: Limit switches or foam bumper + microswitches — last-resort contact detection
- IMU: BNO055 for heading hold — keeps the car driving straight without drift
Safety Systems (Non-Negotiable)
This is the most important step. A 40-pound self-driving car needs multiple layers of safety:
- Hardware kill switch: Big red mushroom button mounted on top, wired in series with the battery. One slap and all power cuts. Anyone can hit it.
- RC override: Dedicated channel on an RC transmitter. Operator can take manual control instantly from 50+ feet away.
- Software watchdog: If the Pi hasn't sent a motor command in 500ms, the motor drivers auto-disable. Protects against software crashes.
- Speed governor: Hard cap in software. 60% max during testing, adjustable for competition.
- Bumper sensors: Physical contact = immediate stop + reverse. No software override.
Choose Your Brain
RC + Sensors
Keep the RC transmitter as primary control. Sensors only provide auto-stop if you're about to hit something. Easiest path to a drivable demo.
Waypoint Following
GPS + IMU + obstacle avoidance. Define a route as lat/lon points, car drives itself between them. Proven architecture for outdoor courses.
Full SLAM
RPLIDAR + ROS2 + Nav2 stack. The car builds a map in real-time and plans paths around obstacles. University-level robotics in a Power Wheels body. Absolutely wild when it works.
Give It a Personality
This build's secret weapon is showmanship. Ideas that have killed at events:
- Cooler bot: Strap a cooler to the back. It drives around and delivers cold drinks to judges. Instant crowd favorite.
- LED underglow + sound: WS2812 LED strips underneath, Bluetooth speaker playing engine sounds or a custom voice ("Please step aside, autonomous vehicle approaching").
- Themed wraps: Mad Max war rig, Jurassic Park explorer, pizza delivery truck. The car is big enough for real signage and props.
- Follow-me mode: Use a camera + person detection to follow the operator around like a loyal robotic mule. Genuinely useful for carrying gear at events.
Competition Ready?
The Power Wheels build is the heavyweight class of Hack-a-Bot:
- Navigation Challenge: Full-sized obstacle course with gates, cones, and narrow passages. The scale makes it genuinely impressive to watch.
- Autonomous Parade: Line up multiple self-driving Power Wheels and have them parade through the arena in formation. Crowd-pleaser guaranteed.
- Freestyle: The sheer spectacle of a driverless kid's car doing anything wins points. Add a theme, a payload, or a purpose and you're competing for best-in-show.
- Utility Challenge: Deliver an object from point A to point B autonomously. The car's cargo capacity makes it the natural choice for payload challenges.
Resources
- r/PowerWheelsMods — Active community for modding ride-on cars (mostly speed/battery upgrades, but good for learning the platform)
- TurtleBot3 (ROS2) — If you go the SLAM route, TurtleBot3's ROS2 packages work on any differential-drive robot, including your Power Wheels
- ROS2 Nav2 — The navigation stack for autonomous robots. Production-grade path planning + obstacle avoidance.